
Connect to Remote Assistance
- Hold the Windows Key, then press “R” to bring up the Run box.
- Type “msra“, then press “Enter“
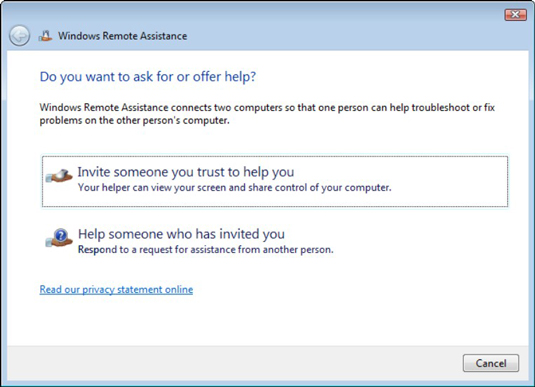
- Select “Invite someone you trust to help you“.
- You may be able to select “Use e-mail to send an invitation” if your default email client is setup properly.
If you are unable to request assistance you may have to Allow remote assistance to this computer, please follow the steps below.
Set up & use Windows Remote Assistance in Windows 10/8.1
Windows Remote Assistance is a good way to give control of your Windows computer to someone whom you trust, remotely. With your permission, your friend or technician can even use own mouse and keyboard to control your PC and show you how to fix a problem – or fix it themselves.
In this post we will see how to set up and Windows Remote Assistance in Windows 10/8.
Set up & use Windows Remote Assistance
Press Win+X and from the menu, select ‘Control Panel’. Search “System.” The window will display all of the basic specifications of your computer such as model number, CPU configuration, installed memory, etc.

Navigate to the Remote tab in System Properties now and select the Allow remote assistance to this computer option and click hit the ‘Apply’ button.

You can even configure certain settings here. For instance, you can set limits for the use of remote assistance, choose to allow the computer to be used remotely, set the maximum amount of invitations.

If you find that your Windows Firewall is blocking Remote Assistance, create a rule to allow it. To do so, open the “Run” dialog box. Type “Firewall.cpl” in the text field and click “OK.’ Windows Firewall control panel will be launched. Go to the left pane and click “Allow an App or Feature through Windows Firewall.”

You should find a list of devices that are disabled/enabled through Windows Firewall. Click “Change Settings.”

Scroll down until you find “Remote Assistance” option. When you find it, click the option to allow remote assistance.
Open an elevated command prompt, type msra.exe and hit Enter to open Windows Remote Assistance. Follow the on-screen wizard. Click on Invite someone you trust to help you or Help someone who has invited you, as the case may be.
Lets say you want to invite someone to have a look at and operate your computer. Click on Invite someone you trust to help you.
You can generate the invitation as a file or use the email to send an invitation or use Easy Connect. I prefer the Use email to send an invitation.

The Invitation file will then be sent to your friend using your email client.

Your friend will then have to enter the code in his Remote Assistance box. After this is done successfully, the two computers will get connected. Once your work is completed, remember to disable this feature.
Bear in mind, Remote Desktop cannot establish a connection with the Remote Computer until remote access to the server has been enabled, the remote computer turned off, and the remote computer is not available on the network. So, make sure the remote computer is turned on, connected to the network, and the remote access is enabled.
Windows 7
-
Choosing Start→Control Panel→System and Security→System→Remote Settings.
Be sure the Remote tab of the System Properties dialog box is showing.
-
Select the Allow Remote Assistance Connections to This Computer check box and then click OK.
The System Properties dialog box will close.
-
Open Windows Help and Support. Click the Ask button and then click the Windows Remote Assistance link.
On the window that appears, click the Invite Someone You Trust to Help You link.
-
On the page that appears, you can choose to use your e-mail to invite somebody to help you.
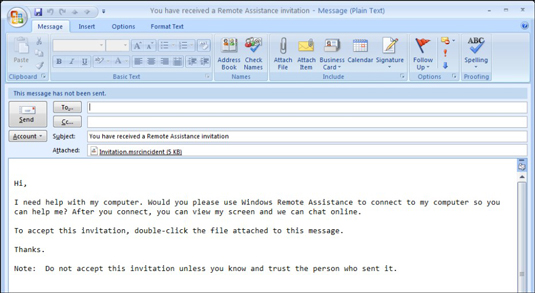 The default e-mail invitation generated by Windows Remote Assistance
You have two options:
-
Click the Send This Invitation as a File link to create a file that you can attach to an e-mail message.
-
Click the Use E-mail to Send an Invitation link to send the invite as an email in a standard e-mail program, such as Outlook.
Remember that it’s up to you to let the recipient know the password — it isn’t included in your e-mail unless you add it.
-
-
In the Windows Remote Assistance window, note the provided password.

Although using a password used to be optional in Windows XP, it’s mandatory in Windows 7, and the password you use must be at least six characters long.
-
When an incoming connection is made, use the tools in the Remote Assistance window to control the session.
You can find tools to adjust settings, chat, send a file, or pause, cancel, or stop sharing.
-
When you’re finished, click the Close button to close the Windows Remote Assistance window. If you want to require a password, enter it and confirm it.
The call will end.